Wednesday, August 27, 2008

Editing digicam images (continued)

The art of editing a digicam picture requires the proper tools, a bit of patience, and some clue what you’d like to see as the final product. These things actually help with any digital photograph, but most professional photographers want to get as perfect a picture as possible with the original snap of the shutter. For us regular folks, we’re more likely to have a digicam and all the troubles that come with it.

With a dSLR, you start with a massive image, lots of detail, and a resolution high enough that real artwork can be done down to the size of a pixel. Wrinkles vanish, hairlines are filled in, blemishes fade away, and pounds can melt into a trim waistline. While possible with what a digicam offers, the artwork is much more difficult and often impossible to fully hide.

Instead of such detailed artwork, we’re going to look at a couple of things that can be quickly and easily done with a digicam’s output. Since I no longer live near a beach, I’m going to have to borrow this image I found on the internet of Trinidad. A quick google search of “beach” landed me this beautiful shot. While I don’t know for certain what camera was used, the compressed jpeg image is the equivalent of a digicam’s shot.


The tool I’ll use is paint.net (found
here), I have a little bit of patience, and what I’d like to see for my final product is a beach with those swimmers out in the water. The young lady on the cell phone is not important to me, so she has to go. Since I can not pluck her out of the image and expect to see the beach that is in front of her, we have to use a bit of digital magic. With a two dimensional image like this, it’s important to remember that, as far as we’re concerned here, there IS no beach directly in front of her. The sand stops at her hip, and starts again on the other side of her hand. Erasing her is worthless, because we’d be left with a vacant area. How, then, would we remove her from the image? To be technically accurate, we cannot. However, we can cover her up.

Sand is wonderful for this, because the very nature of its randomness suits it to be picked up and moved around from one place to another without being obvious. We see the chaotic texture and just accept it without paying too much attention to duplicated ripples. However, the human eye is designed to see patterns, so if you are not careful, it will suddenly become very obvious that something has been done to your image. Water, too, has enough randomness that you can copy its texture across a field and keep it believable.

The key is to make it believable. Not perfect. Ideally, you simply want your viewer to not pay attention to that area, thinking there is nothing important there. If you make it too obvious that artwork has been done, then it will become such a distraction that it may have been better to have left well enough alone. If you are able to mask your work well enough, the illusion will be sufficient for your viewer to simply accept what you are showing them as a straightforward image, revealing only the story you want to tell.

To cover this woman up, I’m going to use the most basic tool available. I’m going to select a square of sand, copy it, then paste it over her. Then I’ll select more sand from a different area, and past that over an edge. I continued doing this, attempting to capture textures (like the streaks of wet sand) that will flow from one block to another and create the illusion of continuity. I’ll take a bit of water, include the sliver of a wave, and do the same for the portion of the woman that is protruding out into the ocean. I’m taking big lumps of pixels and covering her up, just like you would with paint.


And this is the result. The woman is gone, hidden behind big squares of sand and water. Except it is very obvious that there are big squares of sand and water, now. It’s probably worse than when we started, because instead of my viewers simply dismissing the woman as a distracting but unimportant part of the image, they are now focused on that spot and wondering what is wrong with the image. Or their eyes.

While I could go back in and, taking much smaller squares of sand and try to break up the obvious lines, that would be far too much work. Also, any viewer looking close enough would still see the regularity of lines and differences in shade and the effect would be the same.

Let’s start over with a different tool. This one does the same thing that I had been doing, picking up pixels and copying them into another area, but it uses a softer approach more likely to blend and fade into the surrounding textures. This is the tool I’d use in Photoshop as well, but paint.NET is free! While not quite as particular or adjustable as the Photoshop tool, this one will do perfectly fine for our digicam-based masterpiece. This tool is called the Clone Stamp.

I’m going to open the original image up again, and I’m going to select the Clone Stamp tool. Bumping my brush size up to a whopping 8, I’ll then ‘anchor’ the tool over beside her in the sand. Hold the control key and click some sand beside her leg to ‘stamp’ the tool, or anchor it, and then release the control key and begin painting over her legs to ‘paste’ the pixels. You’ll see the small circle of your anchor moving in relation to where you are painting, showing you what pixels you are picking up and copying. Just like painting, you’ll have to pick up more ‘paint’ every once in a while to make sure you’re not making your work too obvious. You’ll have to select a new patch of sand and copy it across, making sure to carry the textures over as believably as possible. A lot of control-click, then paint a few pixels, and then select more pixels, and paint with them.

The portion of her that protrudes into the water (mostly her head) requires even closer detail. You’ll have to zoom in rather close in order to make sure your lines match. You want to make sure to especially capture that section where sand meets water and continue that line from one side of her head to the other.

At this point you may be noticing that the colors are very different from one side of her to the other. The left is a bit brighter than the right. Trying to bring them together makes the difference even more obvious. While paint.NET does not have a ‘smudge’ or ‘blend’ tool as other programs might, it still allows you to use these effects up in the ‘effects’ toolbar. Select a small area where the colors are very different, but the texture is the same. For instance, the area in the water between the two waves. The water is the same blue (if lighter/darker), but the waves are an obvious white that you want to remain crisp. When you have the proper area selected, choose a blur effect. I used the ‘motion blur’ effect in order to sweep the light and dark water together. Zoomed in this close, it looks messy, but when you zoom out, the effect is minimal enough that the viewer’s eye will likely be fooled into thinking the water fades from light to dark in an even way.


This picture is a result of these steps. Looking at that area, you can still see the places I cloned, and possibly a few places where I blurred two areas together. To get a better effect will require more time, especially zoomed in very closely to see the details you want to make less obvious.


This image was taken with the digicam I previously used for the comparison of pink roses. This is an older image, taken during a summer that allowed for more vibrant roses. You can see that the digicam has no trouble focusing on the big, vibrant blooms, and leaving the house and fence to blur into the background. However, it does not give the narrow depth of field that we saw from the D60. To mimic that effect, we’ll use one of the tools we used for the beach image above. We are going to blur some of the pixels to make them look more out of focus. There are two ways to do this.

One way is to select the roses in the foreground (don’t forget the leaves that are at the same distance), copy them into a new layer, and then blur the entire image behind them. Select the roses using the Magic Wand tool (set at 40% tolerance) and use the ctrl-key to select additional patches of pixels. Use your Undo option if you accidentally select more than the subject you want to keep in focus. The other way, the one I chose, is to select the roses (again using the Magic Wand tool), and then reverse our selection (Edit-Reverse Selection) and copy everything except the roses into a new layer. Putting that layer on top of the roses, I deselected it, and used Gaussian Blur set to 10. This allows a little bit of overlap for the blurred pixels to cover the edges of the roses. Doing it the other way would cause a rather sharp edge that makes it look like the roses were cut outs from a different image and out of place in this scene.


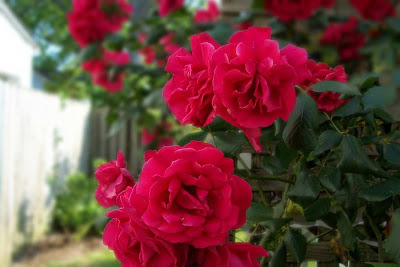
This is the result. It isn’t exactly what a dSLR would give you, but it is closer. Just like with the beach image, more effort and more time spent perfecting the edges and making sure the selections were exact would allow for an even more effective illusion of a narrow focus. Nevertheless, 10 minutes and knowing what you are aiming for, and you have the soft, dreamy look with a specific subject that is still crisp but now stands out more from its background.

Somehow, crisp roses look a lot better than they sound.

Wednesday, August 20, 2008

D60 vs C330 Sensors

I’ve threatened a few times that there was more to tell about the differences between a dSLR and a digicam. There is a lot of information out there, with a lot of websites doing their reviews and trying to help the most people make the most informed decision when preparing to buy a new camera. Those websites get incredibly vague, mostly because there are so many dSLRs, so many digicams, and so many differences among them.

We’re going to focus on two cameras.

Our dSLR is the Nikon D60. The digicam is the Kodak Easyshare C330.

To use a bit of a photography metaphor, we’re going to zoom in a bit closer and focus on the sensors used in these two machines. This is the element that truly differentiates the end product.

The D60 uses a sensor that has, effectively, 10.2 million pixels. That’s what you see on the side of the camera as “10.2 MP” or megapixels. This is the number that most people look at when buying a camera, and is the number most advertisers push as hard as they can. This is the resolution, or how large your images can be printed. You may have seen digicams sporting pretty high number megapixels, too.

Our digicam, the C330, only has 4 megapixels. But you saw the images on the previous post – they are not poor images at all. On a website, or in a newspaper, or even printed up to a 5x7 size, you may be hard-pressed to see the difference in most digicams and dSLRs.

10.2 million pixels, and 4 million pixels – there’s a big difference there. The gap is even wider than these numbers show, however. You see, the D60 has a sensor that is 23.6 by 15.8 mm. That doesn’t mean much until you realize that the C330 has a sensor that is 5.76 x 4.29 mm.

I’m not great at math, so I understand if you’re looking at these numbers and wondering what my point is. Let’s reduce the number of numbers. The C330 has 24.7 mm. The D60 has 372.88. That’s a big difference in size. Here is an image comparison of different sensors from wikipedia so you can get a visual. Compare the 370 mm2 to the 25mm2, both on the right side of the image.

It may seem logical that the larger sensor would mean that the D60 can fit more pixels on the surface, but remember that many digicams are moving upwards of 8mp or higher as well. They are still using the 25mm2 sensor. The D60 not only fits more pixels onto the sensor, but the pixels are able to be larger, which allows them to accept more light, thereby getting a clearer picture with less noise even in darker situations. This higher level of detail means that many things are possible with the D60 that the C330 cannot do, due to risking far worse signal-to-noise ratios that would make the picture worthless. The higher megapixel counts in the digicams actually exacerbate this problem by walking that fine line of signal-to-noise, which means the flash and other light-adjusting parameters must be automatically adjusted to give as much light to those pixels as possible. In daylight, or with bright indoor lights, these 8+ megapixel digicams perform exceptionally well. Beyond that, the results are grainy and can look very soft-focus.

Further Reading:
CBS News
Wikipedia
Luminous Landscape
NY Institute of Photography

Next week - more about editing your images.

Wednesday, August 13, 2008

Post Production

Being a Palette of Pixels, the art form goes far beyond the initial capture. I like to think of that original snapshot, portrait, photograph, as being a raw, frozen instant. It is the real world, caught and framed in such a way as to give your viewers a narrow and focused image or thought. On some level, it is telling a story.

That's why I love the art form.

"A picture is worth a thousand words," they say. But sometimes there's a lot of extraneous words involved that don't contribute to your story. Just like with a written tale, you could leave it as the raw original, but it is often better to look back over what you've captured and start trimming down the excess. Get rid of any distracting elements that don't add to what you're trying to say. You have to know what is important, and what is telling some side story that isn't vital. Also, perfect your language. Make it fit exactly what you're trying to do. Word choice, sentence structure, even punctuation is of utmost importance. After you're done, no one will see how much work you put into making your story succinct, fluid, and streamlined. That's the idea, though. Your brush strokes can be invisible, so long as the story is what you want to tell.

I suppose it counts as a metaphor when I move back and forth between the imagery of a novel and a photograph. Nevertheless, the end result is the same. A good photograph does not have to be a finished product.


Ah, summer break on the beach. Friends hanging out with the other tourists, a bright blue sky and a big golden sun directly overhead. Thoughts of school are far away, and you hop out of the water for a second so your friend can snap a photo before you go in for lunch at the hotel. A perfect shot to remember the moment!

The photograph is 'complete'. Everything's in frame. You've got Scooter, there, and Jessica, names I made up JUST NOW, and they look happy and content. They're looking out of a portrait at their future selves. Their future selves are looking at the portrait going "Aw, we were so young." Or something. And then they send it off to mom, and mom goes "Aw, they're so cute!" And they send it off to their friends in Canada, and they go "Aw, it looks so warm!" And they set the photograph in a cute little frame on their coffee table, and the neighbors come over and see it. And their neighbors go "Aw, who are those people back there?"

Imagine the sound of a record player scratching and the cozy music abruptly ending.

"What? What people? Oh. Um. Other tourists, I guess."

"And how come the ocean looks tilted?"

"Well, we were on the sand, so I guess the camera wasn't straight."

"And why's your hair in your face?"

"Well I just got out of the water."

"Scooter was sucking it in a bit, wasn't he? Look at the -"

"IT IS JUST A PICTURE, STOP IT."

Why should it be just a picture? Trim down your story so only the elements you intend to share are carried across. Don't distract with excess details. Those tourists have their own story. The awesome waves and the way the water felt, you can tell that story without this portrait. Scooter really needed to relax, but he was nervous and you guys had just met. He wanted to look good!

Brush up the sand, smooth out the hair, tilt the image, lose some of those shadows, and offer Scooter the tummy tuck he was trying to do himself...


Now your story is coming through a bit clearer.

Wednesday, August 6, 2008

Digicam vs dSLR (The Rose and Bowl)

The last post was a lot of technical talk about mirrors, lenses, and the differences between how you build the two types of cameras. Sorry if it got to be a bit much, but there's a reason I don't build these contraptions. That stuff is complicated even to me, and I've seen mechanical diagrams.

Today's comparison won't have much of anything to do with the lenses or mirrors involved in the cameras, nor where the viewfinder is located on the body of the camera. The subject is a small cluster if pink roses, taken from about 3 or 4 feet away, using all the default "Auto" settings on both a Kodak Easyshare 4.1 Megapixel digicam, and a Nikon D60 10.2 Megapixel dSLR. We're going to ignore the technical stuff like lens size, exposure rating, flash speed, and all that. Maybe next week we'll revisit these images and poke at all the numbers!

First off, let's introduce our contenders.

This image was taken with the digicam. It's got nice, warm colors, good clarity, and a broad depth of field.

It required me to just turn the camera on, let the motor whir and the lens extend from the body, and I shot the image while looking at the LCD view screen on the back. No squinting and peering through a tiny peep hole, and no settings to worry about. Point, shoot, and you can tell exactly what I'm looking at. The roses are pink, the leaves are green, and even the bird bath is looking kind of spiffy (if a bit dry...)


This next image has been reduced down to the exact same pixel width. It's not as tall, though, because the dimensions of the sensors are different. I'll talk about sensors another time. Think of this camera as "wide screen" like movies at the theater, different from the ones on television. I was standing in exactly the same spot as for the previous image, and of the same rose cluster.

This image is slightly cooler (that means it has more blue to it), but it's still pleasing to the eye. The roses are still pink, and the leaves are still green. Even the birdbath still looks rustic and quaint, and the makers would be pleased to know that the soft plastic looks very much like a copper basin. But if you look at that empty bird bath, you may notice a key difference between the two images. It's a difference that makes the roses in the second image 'pop' out of the background and become more noticeable.


Look at this mess! What a horribly blurry image! You can barely tell what this is, and you probably only guessed that it's the top of the bird bath because you've been looking at the above pictures. This is ridiculous, and would never pass as a standalone picture. The gaps in the side are smeared together in a single, smooth blur, and you can forget telling any detail about the tree in the background. You can't even tell if there is water in the bird bath, or if that's just a smeared reflection of the surface itself. It is so out of focus, you have to wonder what the photographer was looking at.


Well that's a little better. After all, now we can see the holes along the side of the basin, you can be relatively sure that the bowl is empty, and there's even evidence of texture and variations in color in those places where the sunlight hasn't blown out all detail. You could believe that the photographer was pretty interested in this part of the image, and he wanted you to pay some attention to it.

Except that's all wrong. This is supposed to be the background. You want this sort of detail faded out and unimportant, so it doesn't distract from your main subject. If you have too much detail in the background, then you start losing that direction, and it starts to become confusing for your viewers when they try and find what it is they are supposed to be focusing on.

Let's zoom in on the aspect that we do want to focus on.


This is from the dSLR. This is sized to 100%, meaning that the rest of the image would be huge if it tried to fit on your screen. Go ahead and look at that image up there at the top of the page and imagine those little pink roses in the center were this large, and you have it.

Look at the way the detail is sharp and crisp on the roses - and then notice the fact that everything in the background is just gone. There's no chance you can tell what's back there, only that it is mottled green. That's good! That means your viewers are only seeing those flowers and going "Wow, that drought is tough on them!" Well, hopefully they're saying "Wow!" about the pretty pink flowers, too. But they do look kind of rough...


And here we have the image from the digicam, also 100%, so you can go ahead and compare the full image from way above and see how large this image would be. It would also make for a pretty huge picture if you blew it up full-size. Not quite as large as the SLR, but it's not a bad camera at all. But see how you can see the background? You can tell there's a fence, there's some leaves, probably that there's some grassless dirt further on. It's a very busy background.

You'll also notice there's some 'noise' in this image at this size. There are places where the fact that the image was digital becomes very noticeable. Looking close, you'll see places where colors seem to blend into square patches. These are called 'artifacts' and they are the bane of any person who has to work with digital imagery. It's similar, in ways, to the graininess of old film photography, but as you can see, it doesn't have the classic appeal of a grainy .35 mm shot. The places where the digicam become 'blurry' tend more towards the 'smeared' look a lot more than the way the SLR creates a consistent 'soft focus' effect.

The digicam proves once again why and how it is excellent for family shots, quick photos with the kids, and a snapshot of the family garden to email to family far away. But if you want something more than that, with a bit more personality and a lot more potential for art, well...

You'll have to break through that brick wall.