Showing posts with label editing. Show all posts

Monday, September 21, 2009

Camera's in the shop


Currently, A1 Camera Repair in downtown Louisville has my camera in order to do a full-on cleaning of the lens, mirror, and sensor. $45 and 3-5 day turnaround. I'm sure that's fairly typical for someone to do it right (after my previous attempts at cleaning it myself, I discovered that was not what I was doing), but it seems a little steep after Peace Camera in Raleigh offered to do it for free.

Still, "free" and "have to drive 10 hours to get there" put together actually is not free in the strictest of senses.

I meant to actually show you an image of the dust and particles all over the corner of a photograph, in order to illustrate just how bad things were getting. However, since I was fighting with the lens and taking some rather particular shots in order to avoid getting any residuals, I managed not to capture any that clearly showed the problem. I confess, I was not thinking about the blog when I was taking the shots, or I would have taken a photo of some blank white wall or something. As it was, I succeeded in avoiding having dust obviously speckling the photographs I took, and failed in acquiring any examples for you.

"This was a triumph."

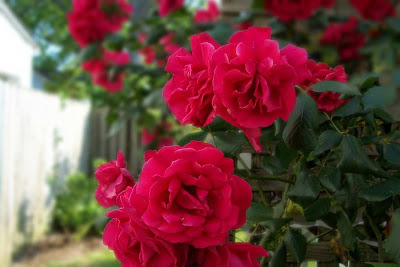
At any rate, some of my current experiments with the automated features of PhotoshopCS4 involve panoramas. Rather than take a really large photograph, I am able to take multiple shots of a scene and then stitch them together in post. I am learning what to do and what not to do, in order to get the results I like. Things to remember: turn off auto focus, don't use a wide-angle lens, definitely do not zoom in and out. These things together will cause the stitching to mis-match and make it very obvious that there were multiple images.

Hopefully the formatting of this post will make sense. I apologize to two groups of people for this: the ones that have me on their RSS feed readers and can't see the image, and the people on dial-up. Because I think it's a rather large image (or was when I uploaded it. I'm still not entirely sure what Blogger/Google/Picassa do to images when I upload them) and will take a while for you to load it.

Click the image to see the photograph bigger and clearer. The dusky lines crossing it at different points are the result of an artistic shutter speed in light that was getting too dark for it. It makes for an appealing vignette in individual images. When stitched together, you get this.

Addendum:
Speaking of RSS Feeds, keep up with me on Twitter for a slightly more up-to-date update on what I'm doing around town. I will sometimes announce trips to various places, and if you'd like a moment in the spotlight you may wind up as the subject of an impromptu photoshoot. I'll also be announcing next month's sale for my website. Just go to Twitter and look up tlamkinjr .

Sunday, September 6, 2009

End of Summer

It's been another few months of radio silence, but a lot has changed in the meantime. While one of our party is now gainfully employed, the other has taken a career change and even moved. Though looking for new work, and limited to a laptop after burning up the work-horse desktop computer, I haven't slowed down my graphical pursuits at all. The paint on this palette hasn't dried yet. Speaking of which...

I haven't forgotten about the camera cleaning experiment. In fact, I've come back to you with some results!

Blowing on the lens yourself is always a bad idea, but I have found that many shops will suggest you try gently hitting the lens surface with a shot from the canned air they sell in many shops like Staples and even Wal-Mart. Stores specifically catering to the tech-savvy demographic will have more variety for you to choose from, and probably higher quality compressed air. Something to keep mindful of, no matter which brand you choose, is the law of thermodynamics. No, I'm not going to quote them, but just realize that this is compressed air that is suddenly being un-compressed as it comes out of the can. The can will get cold as you continue holding down the release, and there is the potential that the air will remain liquid if you spray for too long or at an odd angle. Now you may have gotten rid of the dust, but there is spots of chemical spray on your lens.

Those same shops will offer you a chamois ("shammy" for the uninitiated) cloth to brush off the larger dust particles. Be very careful to keep this cloth clean, because any dust or grit on the cloth could mean scratches on your lens the next time you brush it. Better to use a long-bristled (very SOFT) brush. This is still a potential hazard, as anything could be between the bristles just waiting to alight on the lens.

The kits - I confess, I never did trust the kits enough to try them on my camera or lenses.

This should amuse, though, to make up for it. After trying out these different methods to remove a couple of dust spots, I am now going to go with the final, fool-proof solution. I am going to look for a camera repair shop, tomorrow, that offers professional cleaning to both the mirrors and the lens.

How do you think I know the negative sides of those other methods? Yeah, woops. Learn from my mistakes!

----


In other news, the photography bug has really grabbed me and I hope to make a career of it. If I cannot, I will do what I can to assist another photographer while I soak up all the knowledge and experience I can possibly garner. This new city is gorgeous and lends itself to countless possibilities for me to experiment and practice various techniques.

Feel free to see some of the pieces I've finished recently on my new gallery.

Wednesday, September 17, 2008

Make them Smile


Last week we skipped the pictures to talk about a different part of the palette. Prior to that, I promised we would go over smiles.

Smiles are very important in an image. They're not always necessary, but always important. Maybe I should say that people's expressions are always important. The presence, or absence, of a smile can tell a lot about a situation. Sometimes a smile would seem horribly out of place - or even horrific. Other times, the absence of a smile makes the image look bland, or dull, just as you would feel if you were in that situation with the subjects and no smiles were to be found.

Photographers, in order to get the right smile from their subject, often have to resort to tactics used by other professions that thrive on smiles. A photographer can suddenly morph into a clown, or a comedian, or a suave politician trying to talk someone into reluctantly smiling despite themselves. Sometimes, though, this transformation is not an option. In candid images, for example, you don't want the people's attention on you. Also, in crowds, it may simply not be possible to get everyone in the frame to smile.

Nevertheless, if you're showing a portrait of people at an event, you'd like to capture a moment where they are having fun.


Here is an example of some people watching a parade. You have a few different expressions, here. The man in the foreground seems to be smiling almost reluctantly. He's having fun, almost like something has unexpectedly amused him despite the frown lines and wrinkles that may belie a somewhat dour attitude. The woman beside him has the tight-lipped smile of someone uncomfortable with the expression. Maybe she's self-conscious about her teeth, or maybe she just really hates the photographer. Behind them are more grins of people watching the parade, and even the fellow walking by seems to be chuckling to himself. The picture is full of life, and of different stories, but the sum of the parts is that people are having fun. This is a place you would want to be, and it is an even that can make anyone grin.

This is the portrait you would like to hand the event organizer, or someone possibly interested in hosting a similar event. The image could be what convinces them that a parade is just the thing they need to bring some life to their town. It is good advertising,and it tells a good story.

Like most advertising, this image is a lie. I used the same techniques we've been talking about: blur, smudge clone-stamp, and even some copy-pasting. I took more time, about 20 minutes, and worked in closer detail. It is my hope that you cannot immediately tell what artwork I did to the image. Comparing a before-and-after, though, would show what things required my attention.


Here is the original photograph of these people as they watch the parade.


A photographer, a comedian, and even a politician can convince people to smile.

Me? I can make them smile.

Wednesday, September 3, 2008

Restoring a Portrait

It can be a lot of fun making sure your digital photographs look pristine and clear of intruding tourists. Photographs that tell a reliable story can capture a moment for a long time. Did you know that modern ink used in home printers is actually designed for archive use? Tests have shown that desktop printed documents are capable of surviving over 200 years. That’s a long time for you to be keeping pictures of Scruffy the dog, still wet from his first bath.

Some images, however, are priceless. They’re not printed on modern acid-free paper, using this state-of-the-art ink that makes us glad we’re not running our cars on anything made by Lexmark. These photographs are often of our own ancestors, the portrait surviving only because it has been behind glass for years, or was tucked into the attic for a couple generations, or sheer luck. Sometimes luck isn’t enough and time takes its toll despite our best efforts.


This is another image I found on the internet. There is an amazing amount of old photographs that have been scanned and uploaded onto the world wide web, and many of them are in similar condition to this. Age spots, mildew, water damage, creasing, wrinkles, and simply the changes in environment making the ink peel and flake off – many things can cause these minor bits of damage that grow to ruin the entire image. Soon, the portrait becomes unrecognizable and it goes from priceless to worthless. This effect is tragic, but correctable.

It used to be, before digital technology, that a skilled artisan needed to step in and take the original photograph to a laboratory. There, under a microscope or multiple magnifying glasses, the artist would carefully paint, cut, paste, and eventually repair the marred surface of the image. It was a painstaking process, not least of all because the artist was working with the original piece. If anything should happen, the photograph is gone, and is irreplaceable.

Nowadays, with scanners and other digital-capture devices (even your camera!), you can have something to work with and leave the precious original alone. To mimic the hard work performed by the artist mentioned previously, you simply need to use the methods I mentioned in the beach scene. You cannot erase the damaged sections, but you can take pixels from another section and paint over the flaw. Taking your time and envisioning what result you want will allow you to gradually restore the portrait to its prior glory. With the right training and a lot more time devoted to the project, it is even possible to improve on the original and clear up errors inherent in old photography – even adding color to a black-and-white portrait!

Here is the result of a few minutes’ work on this piece I found.


If you did not know it was originally damaged, it should be difficult to tell that anything has been done to the image. It is still very soft-focused, the colors are all the same, and lines that are supposed to be continuous do follow from one point to another without apparent disruption.

Just for comparison sake, here are the two images side-by-side.


Now if only we could make her smile…

We can. We’ll do that next week.

Wednesday, August 27, 2008

Editing digicam images (continued)

The art of editing a digicam picture requires the proper tools, a bit of patience, and some clue what you’d like to see as the final product. These things actually help with any digital photograph, but most professional photographers want to get as perfect a picture as possible with the original snap of the shutter. For us regular folks, we’re more likely to have a digicam and all the troubles that come with it.

With a dSLR, you start with a massive image, lots of detail, and a resolution high enough that real artwork can be done down to the size of a pixel. Wrinkles vanish, hairlines are filled in, blemishes fade away, and pounds can melt into a trim waistline. While possible with what a digicam offers, the artwork is much more difficult and often impossible to fully hide.

Instead of such detailed artwork, we’re going to look at a couple of things that can be quickly and easily done with a digicam’s output. Since I no longer live near a beach, I’m going to have to borrow this image I found on the internet of Trinidad. A quick google search of “beach” landed me this beautiful shot. While I don’t know for certain what camera was used, the compressed jpeg image is the equivalent of a digicam’s shot.


The tool I’ll use is paint.net (found
here), I have a little bit of patience, and what I’d like to see for my final product is a beach with those swimmers out in the water. The young lady on the cell phone is not important to me, so she has to go. Since I can not pluck her out of the image and expect to see the beach that is in front of her, we have to use a bit of digital magic. With a two dimensional image like this, it’s important to remember that, as far as we’re concerned here, there IS no beach directly in front of her. The sand stops at her hip, and starts again on the other side of her hand. Erasing her is worthless, because we’d be left with a vacant area. How, then, would we remove her from the image? To be technically accurate, we cannot. However, we can cover her up.

Sand is wonderful for this, because the very nature of its randomness suits it to be picked up and moved around from one place to another without being obvious. We see the chaotic texture and just accept it without paying too much attention to duplicated ripples. However, the human eye is designed to see patterns, so if you are not careful, it will suddenly become very obvious that something has been done to your image. Water, too, has enough randomness that you can copy its texture across a field and keep it believable.

The key is to make it believable. Not perfect. Ideally, you simply want your viewer to not pay attention to that area, thinking there is nothing important there. If you make it too obvious that artwork has been done, then it will become such a distraction that it may have been better to have left well enough alone. If you are able to mask your work well enough, the illusion will be sufficient for your viewer to simply accept what you are showing them as a straightforward image, revealing only the story you want to tell.

To cover this woman up, I’m going to use the most basic tool available. I’m going to select a square of sand, copy it, then paste it over her. Then I’ll select more sand from a different area, and past that over an edge. I continued doing this, attempting to capture textures (like the streaks of wet sand) that will flow from one block to another and create the illusion of continuity. I’ll take a bit of water, include the sliver of a wave, and do the same for the portion of the woman that is protruding out into the ocean. I’m taking big lumps of pixels and covering her up, just like you would with paint.


And this is the result. The woman is gone, hidden behind big squares of sand and water. Except it is very obvious that there are big squares of sand and water, now. It’s probably worse than when we started, because instead of my viewers simply dismissing the woman as a distracting but unimportant part of the image, they are now focused on that spot and wondering what is wrong with the image. Or their eyes.

While I could go back in and, taking much smaller squares of sand and try to break up the obvious lines, that would be far too much work. Also, any viewer looking close enough would still see the regularity of lines and differences in shade and the effect would be the same.

Let’s start over with a different tool. This one does the same thing that I had been doing, picking up pixels and copying them into another area, but it uses a softer approach more likely to blend and fade into the surrounding textures. This is the tool I’d use in Photoshop as well, but paint.NET is free! While not quite as particular or adjustable as the Photoshop tool, this one will do perfectly fine for our digicam-based masterpiece. This tool is called the Clone Stamp.

I’m going to open the original image up again, and I’m going to select the Clone Stamp tool. Bumping my brush size up to a whopping 8, I’ll then ‘anchor’ the tool over beside her in the sand. Hold the control key and click some sand beside her leg to ‘stamp’ the tool, or anchor it, and then release the control key and begin painting over her legs to ‘paste’ the pixels. You’ll see the small circle of your anchor moving in relation to where you are painting, showing you what pixels you are picking up and copying. Just like painting, you’ll have to pick up more ‘paint’ every once in a while to make sure you’re not making your work too obvious. You’ll have to select a new patch of sand and copy it across, making sure to carry the textures over as believably as possible. A lot of control-click, then paint a few pixels, and then select more pixels, and paint with them.

The portion of her that protrudes into the water (mostly her head) requires even closer detail. You’ll have to zoom in rather close in order to make sure your lines match. You want to make sure to especially capture that section where sand meets water and continue that line from one side of her head to the other.

At this point you may be noticing that the colors are very different from one side of her to the other. The left is a bit brighter than the right. Trying to bring them together makes the difference even more obvious. While paint.NET does not have a ‘smudge’ or ‘blend’ tool as other programs might, it still allows you to use these effects up in the ‘effects’ toolbar. Select a small area where the colors are very different, but the texture is the same. For instance, the area in the water between the two waves. The water is the same blue (if lighter/darker), but the waves are an obvious white that you want to remain crisp. When you have the proper area selected, choose a blur effect. I used the ‘motion blur’ effect in order to sweep the light and dark water together. Zoomed in this close, it looks messy, but when you zoom out, the effect is minimal enough that the viewer’s eye will likely be fooled into thinking the water fades from light to dark in an even way.


This picture is a result of these steps. Looking at that area, you can still see the places I cloned, and possibly a few places where I blurred two areas together. To get a better effect will require more time, especially zoomed in very closely to see the details you want to make less obvious.


This image was taken with the digicam I previously used for the comparison of pink roses. This is an older image, taken during a summer that allowed for more vibrant roses. You can see that the digicam has no trouble focusing on the big, vibrant blooms, and leaving the house and fence to blur into the background. However, it does not give the narrow depth of field that we saw from the D60. To mimic that effect, we’ll use one of the tools we used for the beach image above. We are going to blur some of the pixels to make them look more out of focus. There are two ways to do this.

One way is to select the roses in the foreground (don’t forget the leaves that are at the same distance), copy them into a new layer, and then blur the entire image behind them. Select the roses using the Magic Wand tool (set at 40% tolerance) and use the ctrl-key to select additional patches of pixels. Use your Undo option if you accidentally select more than the subject you want to keep in focus. The other way, the one I chose, is to select the roses (again using the Magic Wand tool), and then reverse our selection (Edit-Reverse Selection) and copy everything except the roses into a new layer. Putting that layer on top of the roses, I deselected it, and used Gaussian Blur set to 10. This allows a little bit of overlap for the blurred pixels to cover the edges of the roses. Doing it the other way would cause a rather sharp edge that makes it look like the roses were cut outs from a different image and out of place in this scene.


This is the result. It isn’t exactly what a dSLR would give you, but it is closer. Just like with the beach image, more effort and more time spent perfecting the edges and making sure the selections were exact would allow for an even more effective illusion of a narrow focus. Nevertheless, 10 minutes and knowing what you are aiming for, and you have the soft, dreamy look with a specific subject that is still crisp but now stands out more from its background.

Somehow, crisp roses look a lot better than they sound.

Wednesday, August 13, 2008

Post Production

Being a Palette of Pixels, the art form goes far beyond the initial capture. I like to think of that original snapshot, portrait, photograph, as being a raw, frozen instant. It is the real world, caught and framed in such a way as to give your viewers a narrow and focused image or thought. On some level, it is telling a story.

That's why I love the art form.

"A picture is worth a thousand words," they say. But sometimes there's a lot of extraneous words involved that don't contribute to your story. Just like with a written tale, you could leave it as the raw original, but it is often better to look back over what you've captured and start trimming down the excess. Get rid of any distracting elements that don't add to what you're trying to say. You have to know what is important, and what is telling some side story that isn't vital. Also, perfect your language. Make it fit exactly what you're trying to do. Word choice, sentence structure, even punctuation is of utmost importance. After you're done, no one will see how much work you put into making your story succinct, fluid, and streamlined. That's the idea, though. Your brush strokes can be invisible, so long as the story is what you want to tell.

I suppose it counts as a metaphor when I move back and forth between the imagery of a novel and a photograph. Nevertheless, the end result is the same. A good photograph does not have to be a finished product.


Ah, summer break on the beach. Friends hanging out with the other tourists, a bright blue sky and a big golden sun directly overhead. Thoughts of school are far away, and you hop out of the water for a second so your friend can snap a photo before you go in for lunch at the hotel. A perfect shot to remember the moment!

The photograph is 'complete'. Everything's in frame. You've got Scooter, there, and Jessica, names I made up JUST NOW, and they look happy and content. They're looking out of a portrait at their future selves. Their future selves are looking at the portrait going "Aw, we were so young." Or something. And then they send it off to mom, and mom goes "Aw, they're so cute!" And they send it off to their friends in Canada, and they go "Aw, it looks so warm!" And they set the photograph in a cute little frame on their coffee table, and the neighbors come over and see it. And their neighbors go "Aw, who are those people back there?"

Imagine the sound of a record player scratching and the cozy music abruptly ending.

"What? What people? Oh. Um. Other tourists, I guess."

"And how come the ocean looks tilted?"

"Well, we were on the sand, so I guess the camera wasn't straight."

"And why's your hair in your face?"

"Well I just got out of the water."

"Scooter was sucking it in a bit, wasn't he? Look at the -"

"IT IS JUST A PICTURE, STOP IT."

Why should it be just a picture? Trim down your story so only the elements you intend to share are carried across. Don't distract with excess details. Those tourists have their own story. The awesome waves and the way the water felt, you can tell that story without this portrait. Scooter really needed to relax, but he was nervous and you guys had just met. He wanted to look good!

Brush up the sand, smooth out the hair, tilt the image, lose some of those shadows, and offer Scooter the tummy tuck he was trying to do himself...


Now your story is coming through a bit clearer.